

How To Install Cd Drive In Windows 7
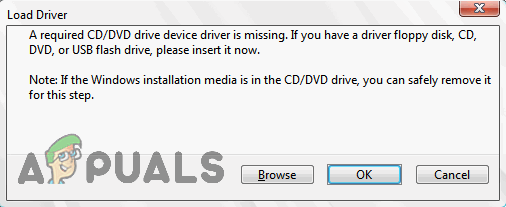
CDs and DVDs are very chop-chop becoming obsolete mediums and are being overtaken past USB drives. This is true even in the case of Windows installation media. While it is truthful that Windows 7 came out during a fourth dimension where using CDs and DVDs to install Windows was nevertheless the norm, the nearly common Windows 7 installation medium today are USB drives. Well-nigh every person who wants to install Windows 7 on a computer in this day and age uses a Windows 7 installation USB to do so, only being the near commonly traveled route does not hateful that it's not bumpy. When using Windows seven installation USBs to install Windows 7 on computers, many people accept reported seeing an error message at the very kickoff of the installation process, an mistake message that reads:
"A required CD/DVD drive device driver is missing. If y'all have a driver floppy disk, CD, DVD, or USB flash drive, please insert it at present."
What causes the "A required CD/DVD bulldoze device commuter is missing" error message?
Upon seeing this error message, the showtime thing whatsoever affected user would wonder will most certainly be why they're seeing it in the first place. The error bulletin points at a missing CD/DVD drive device driver, while they're non using the CD/DVD drive to install Windows 7 in the first identify – they're using a USB bulldoze. Well, that'southward just a difference in terminology – the semantics remain the same. This error, in cases other than when it is caused by happenstance or something incredibly generic, is brought on by the utilise of a USB three.0 drive to install Windows 7. You lot see, the Windows 7 installation environment does not take native support for USB 3.0 because the format only wasn't all that common back when Windows vii first came out. That being the case, using a USB 3.0 Windows 7 installation USB or plugging a Windows vii installation USB into a USB 3.0 port on your computer will result in you seeing the "A required CD/DVD drive device commuter is missing" error bulletin when you try to install Windows vii. Even if it doesn't, in some cases, tiresome USB 3.0 speeds are caused due to Windows 7 ISO being relatively older than the format and this can as well cause errors during the installation.
What causes this issue is non the only affair that'due south known, even so – its remedies are quite well known too. The following are the accented most effective solutions you can apply to try and resolve this problem, get rid of the "A required CD/DVD drive device driver is missing" error bulletin and successfully install Windows 7 using your Windows vii installation USB:
Solution i: Unplug the USB drive and plug it back in
Commencement and foremost, you demand to dominion out happenstance or some kind of a one-fourth dimension-only outcome with your installation USB or the USB port information technology is plugged into or some other incredibly generic issue is the reason why you're seeing the "A required CD/DVD drive device driver is missing" fault bulletin when you lot endeavour to install Windows 7. In social club to do so, all you lot demand to do is unplug your Windows 7 installation USB, wait for a trivial while and plug it dorsum into the USB port. One time done, try booting from the installation USB and installing Windows 7 to see if the error message all the same persists.
Solution 2: Unplug the USB bulldoze and plug information technology into a different USB port
You might be seeing the "A required CD/DVD drive device commuter is missing" error message when installing Windows 7 from a Windows 7 installation USB because there's some kind of a problem with the USB port the USB bulldoze is plugged into. If there's no problem with the USB port, the USB port you're using might merely be a USB 3.0 port, and as stated before, the Windows 7 installation environs simply doesn't have USB three.0 back up, meaning that it might simply exist unable to read the installation files that are on the installation USB. If that'south the case, you can get rid of the error bulletin by simply unplugging the USB bulldoze from the USB port it is plugged into and plug it into a different USB port on your computer. Information technology would help your case a great deal if the USB port you plug the installation USB into is a port you definitely know to be a USB ii.0 port. Also, verify that the USB ports don't have any power surge issues because that can also interrupt during ISO installation.
One time y'all have the installation USB plugged into a different USB port, endeavor booting from the installation USB and installing Windows 7 to see if the issue has been fixed.
Solution 3: Disable USB 3.0 Configuration in Pre-Bone
On many computers, especially computers that only have USB three.0 ports, the BIOS has a setting namedUSB 3.0 Configuration in Pre-Os. This nifty trivial setting defines whether the USB ports on the figurer, earlier the computer boots into its Operating System, function every bit USB 3.0 ports or USB two.0 ports. If you're seeing the "A required CD/DVD drive device driver is missing" error bulletin while trying to install Windows 7 from a Windows vii installation USB, you might exist able to become rid of the error message bydisablingtheUSB three.0 Configuration in Pre-Ossetting in your computer's BIOS (or by setting it toAuto, which substantially achieves the same thing we were trying to pastdisablingit). If y'all would like to use this solution, you need to:
- Removethe Windows 7 installation USB from the computer andrestartit.
- On the very showtime screen, you see when the reckoner boots up, press the key specified on the screen to get into your estimator'sBIOS orSetup. The key you need to press volition be clearly specified on the start screen you lot come across when the estimator boots upwards and varies from i computer manufacturer to the next.
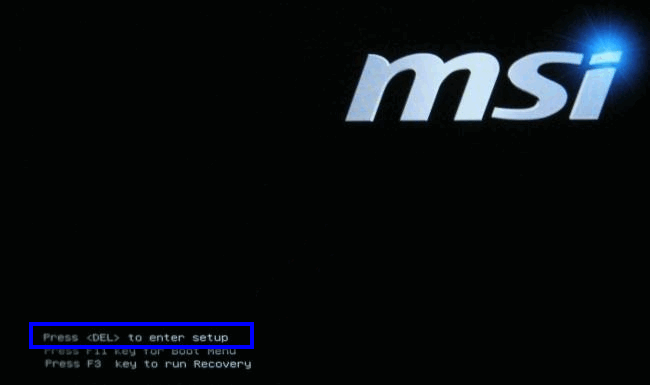
Printing [fundamental] to enter setup - One time you're inside your estimator'southBIOS, brand your way toOrganisation Configuration.
- Locate and navigate to theUSB 3.0 Configuration in Pre-OSsetting.

Locate the USB 3.0 Configuration in Pre-Os setting - Changethis setting fromEnabledto eitherDisabledorAuto, respectively resulting in all USB iii.0 ports on the computer being treated as USB 2.0 ports until the OS is loaded or USB ports, until the Bone is loaded, being treated as USB 3.0 or USB 2.0 ports depending on the kind of USB drives that are plugged into them.
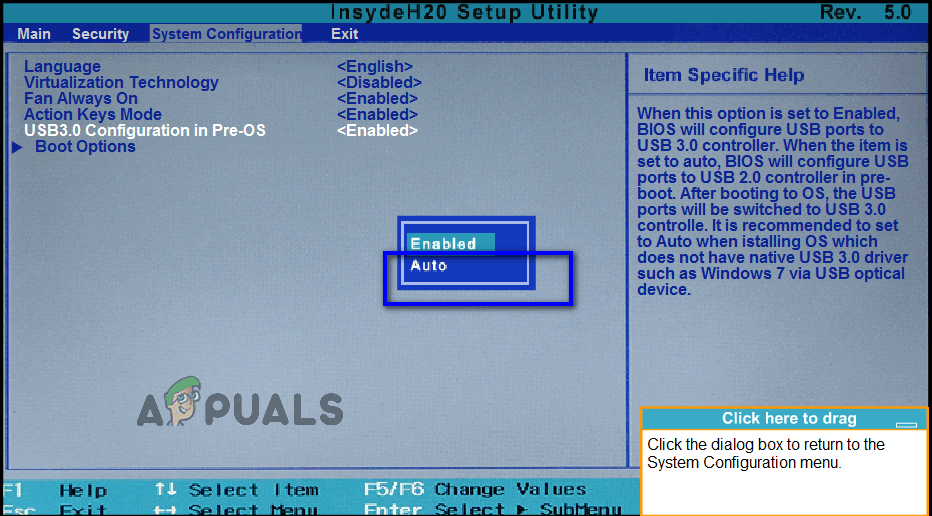
Set USB three.0 Configuration in Pre-Bone to Car or Disabled - Savethe changes you have made andgo outyour computer'sBIOS.
When y'all're done, plug your Windows vii installation USB dorsum into the computer, kick from it and try to install Windows 7. You lot should now be able to successfully install Windows 7 without running into the "A required CD/DVD drive device commuter is missing" error bulletin. Be certain to setUSB three.0 Configuration in Pre-OSback toEnabledafter Windows 7 has been installed.
Solution 4: Installing Motherboard USB Drivers
In some cases, the error might be triggered if certain drivers are missing from your computer on which Windows 7 is to exist installed. Therefore, in this pace, we volition be installing some Motherboard drivers after downloading the Gigabyte Motherboard Utility from a link and so make a bootable USB through that. For that:
- Navigate to this link and click on the "download" button in the top correct corner.
- Wait for the files to be downloaded and extract them to the desktop afterward.
- Navigate inside the binder where you accept extracted the files and double click on the "WindowsImageTool.exe" file.

Clicking on the "WindowsImageTool.exe" option - Once the awarding has been started, select the USB that you previously made bootable to install Windows 7 and check all the three options below.
- Click on the "Start' push button and await for the process to be completed.
- Now, cheque to see if the issue persists.
Note:You can also attempt to manually download the USB chipset drivers for your motherboard to the computer on which you lot are installing Windows 7 and and so during installation cull the browser my computer for drivers and select the appropriate drivers for your computer during that.
Method 5: Disable AHCI Mode
If your CD/DVD drive is not compatible with the Microsoft AHCI driver (msahci.sys), your disk controller may be set to AHCI in the arrangement BIOS.
The SATA interface can operate in two modes, IDE and AHCI:
IDE: A compatibility way for older equipment and software. In fact, in this mode SATA capacity is no different from its predecessor, ATA (or PATA) interface;
AHCI: A new style for retentiveness devices, where a computer tin use all SATA advantages, primarily higher speed of information commutation with SSD and HDD (Native Command Queuing technology, or NCQ), likewise as hot-swapping of hard disks. When you activate AHCI mode, it increases the speed of admission to files in memory devices and improves the overall performance of your computer.
You may be able to resolve the upshot by disabling AHCI fashion for your deejay controller in the BIOS. There are multiple BIOS manufacturers and BIOS versions, you should cheque your organisation documentation or visit your PC manufacturers website for exact instructions on how to change this setting
The basic process for changing the disk controller setting is to restart your computer and entering the system BIOS is as follows.
- Restart your computer and wait for it to shut downwardly completely.
- When the PC is booting upwards, printing the "F2" or the "F12" key repeatedly to get into the figurer'southward bios.
- Once within the bios, navigate effectually information technology until you come to the Storage controller setting which offers you to select from "AHCI","IDE", RAID or "ATA" mode.
- Brand sure to select another selection and unselect the AHCI option in this setting.
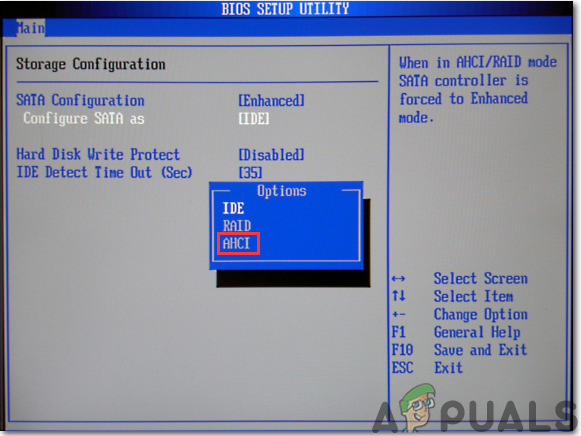
Unselecting this option - Save your changes and reboot the calculator.
- Cheque to run into if changing this setting has fixed the consequence and if information technology doesn't, make sure to try all the other options 1 by one earlier yous surrender on this method.Alert: Incorrect settings in the System BIOS can crusade your PC's function incorrectly. If you are not familiar with configuring the organization BIOS, you should contact the PC manufacturer for assistance.
Method vi: Manually Install The IRST Driver (DELL Users Only)
Intel Rapid Storage Technology is a Windows-based application that provides improved performance and reliability for systems equipped with SATA disks for desktop, mobile, and server platforms. When using 1 or multiple SATA disk drives, y'all tin take reward of enhanced performance and lower power consumption.
This commuter might also exist necessary to properly employ the motherboard that you are using because intel is known for pushing its motherboard drivers across other ones and you might really be able to fix this issue past installing this commuter. In social club to install this commuter, follow the steps below.
- Download the "Intel Rapid Storage Applied science F6 Driver" for Windows 7 64-scrap from the Dell Support Website (dell.com/back up/dwelling house).
- Click the Drivers & downloads link. Ensure that the operating organisation that yous are using is selected from the list of available ones.
- Click the arrow and click the download link for the Intel Rapid Storage Technology F6 Driver.
- Extract and re-create the IRST drivers to a USB 3.0 key, double-click the file, and follow the prompts to extract the compressed files.).
- Kick your organization to the Windows 7 Professional 64-bit media using theF12 kick menu to select your kicking device.
- When you are prompted to load a driver, insert the USB 3.0 central that contains the IRST driver, and install the Intel Rapid Storage Applied science Driver.
- The Windows vii Professional installation should continue now.
Note: If your system does not recognize any USB devices, then y'all are almost probable trying to install Windows 7 to a organisation with the Skylake Chipset. Downloading the about current Dell Windows 7 ISO or inserting the USB three.0 driver into your Windows vii image should resolve the outcome.
Method 7: Utilize USB3.0 Creator Utility
The Intel USB 3.0 Creator Utility is a tool for adding USB 3.0 driver back up to Windows 7 Installation Media. Well-nigh of the users have reported that missing USB3 drivers were the root cause of the outcome hence follow the steps indexed below to apply the USB Creator Utility for preparing your Flash Drive:
- Make certain to completely shut downwardly your computer.
- Use some other computer internet connectivity and and so download the "win7-USB3.0-creator-utility.zip". After download, you may unzip the cipher file if yous desire. Click here to download the win7-USB3.0-creator-utility.zip Note: Cheque out more than culling utilities to install missing drivers of Windows 7 bootable USB.
- Extract the zip file and Run this "Installer_Creator.exe" file which is located inside the nada file.
- Click on "Yes" and Windows will enquire for your permission to run this file. Delight allow it to run. After allowing it, the "USB 3.0 commuter creator utility" will open in front of you.
- Click on the browse button (3 dots) icon and and then select the USB drive (Windows seven bootable USB drive).
- Click onOK
- Click on the "Create Prototype" Later clicking, it will start installing. It volition take time, then please look for its finish message "Update Finished". Subsequently getting this finished message, you may shut the utility and take out the USB drive (flash drive) from the estimator.
At present, your USB bulldoze is ready and loaded USB 3.0 drivers. Y'all may use this USB drive to install Windows 7 even on the new generation's computers. - Put this USB drive to the estimator where you desire to install Windows 7 OS. Put this Windows 7 bootable drive to another USB port of the computer and don't plug it into the same port where you were connected it final time.
- Boot your reckoner through the USB drive and hopefully, the outcome would've been resolved until now.
Method eight: Make a bootable USB Bulldoze With Windows Utility Plan
Numerous users reported that they were able to go around this issue by burning the ISO files over again on the USB Drive with the help of the Windows Utility Program. Hardly any commercial USB drives are suitable from the commencement for these diverse tasks. This is because near models are only loaded with a single file system when you lot first get them, for example, a FAT32 or exFAT file system. You can simply use the cmd.exe awarding, better known as "Command Prompt", to create a bootable USB drive on all operating systems from Windows Vista (including Windows x). This goes as follows:
- Plug the USB drive into your computer's USB port.
- Search for the "cmd" application in the Windows kickoff menu, correct-click on the detail, and select "Run as ambassador" from the context card. This opens a small window with white text on a black background.
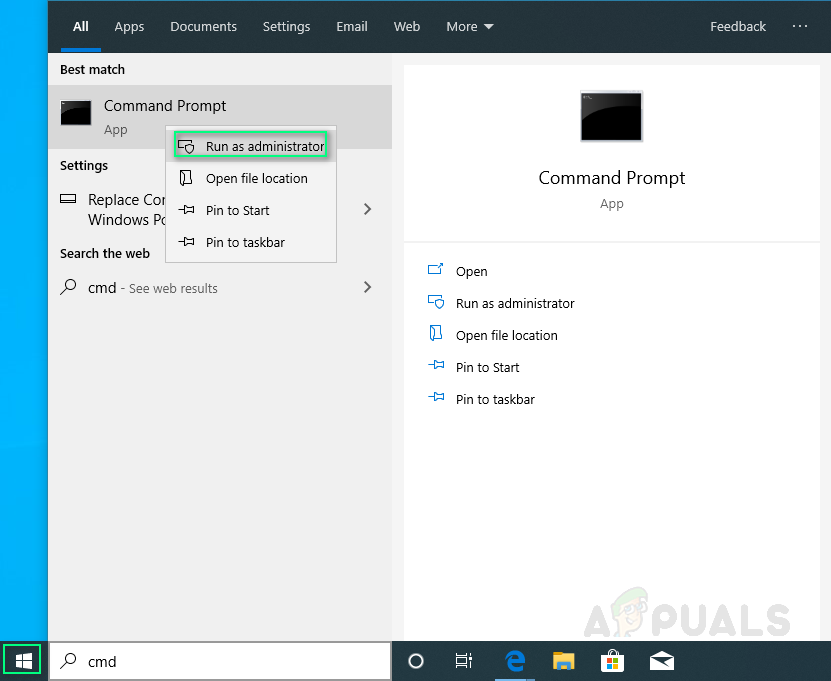
Running cmd as Administrator - Blazon the command "diskpart" and confirm your input with the enter key (you'll also practise this subsequently every other entered command). This starts the storage device manager.
- Enter the command "listing deejay" to display all available storage devices.
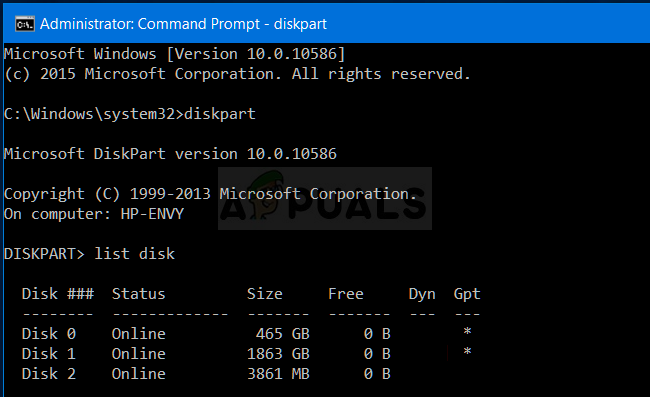
Listing available disks in DISKPART - Y'all can recognize your USB by its storage capacity, and information technology's usually listed equally "deejay 1". In the system partition, "disk 0" is unremarkably your PC, then a hard drive or solid-country drive in your reckoner.
- Based on the assumption that your USB has the label "disk 1", enter the command "sel disk 1" to select information technology (or the corresponding "deejay 2", etc.).
- Enter the command "clean" to delete all files from the USB.
- Enter the control "create sectionalisation primary" to create a main partitioning.
- Enter the command "listing par" and select the newly created chief partition with "sel par 1".
- Activate the partition with the command "agile".
- Format the USB with the command "format fs=FAT32 label="WINDOWSUSB" quick override" (in place of "WINDOWS USB" you can besides choose some other label, and then long equally it doesn't contain any spaces or special characters. The drive volition later be displayed nether this name if yous plug into a running Windows computer). Formatting may take a while and you tin track its progress in the percent bar.
- As soon as the process is finished, enter the command "assign" to automatically assign a drive letter (for case "G:") to your USB.
- Enter "get out" to shut DiskPart, and and so "exit" again to close the control prompt.
- To terminate the process, yous just take tore-create the Windows ISO file to a bootable USB stick. This is done with a bones drag-and-drop. Note: If you're using an installation disc, you tin also drag all setup files from there onto your drive (apply the folder options to brandish all of the hidden files first). That's all possible in the command prompt as well. For a source media with the drive alphabetic character "D:" and a USB drive with the letter of the alphabet "G:", the corresponding command would look as follows: "xcopy D:\*.* G:\*.* /S /Due east /F" (all of the spaces are intentional).
- Now, restart your system, boot from the USB, and try to install Windows 7. Hopefully the error would've been rectified.
Method 9: Inject USB3 Controller Drivers into kicking.wim
Judging from the mistake description, you lot might be tempted to notice and add the storage controller to the kick.wim file which contains the WinPE environment. When performing the installation from USB, what Windows Setup needs to accept is in fact the USB Controller drivers to access the installation source files. The fault bulletin was solved by injecting the USB3 controller drivers into kicking.wim, using the following steps:
- Copy the boot.wim file containing the Windows Setup PE from the installation media toD:\Temp.
- Download the USB3 controller drivers from the laptop manufacturer's website and so extract the drivers (cat/inf/sys files, non the setup.exe!) from this installation packet. Afterward, copy the drivers to the post-obit directory:
D:\Temp\drivers.
- Now, create a temporary mounting point directory at the following location:
D:\Temp\Mount.
- Mount the WIM file using the command indexed beneath:
dism /mount-wim /wimfile:D:\TEMP\kicking.wim /index:2 /mountdir:D:\TEMP\mount
- Afterward, inject the USB3 hub drivers using the following commands one by one respectively:
dism /image:"D:\Temp\mount" /add-driver /commuter:"D:\Temp\drivers\USB3\nusb3hub.inf"
- So add the USB3 host controller drivers using the commands stated below:
dism /paradigm:"D:\Temp\mount" /add-driver /commuter:"D:\Temp\drivers\USB3\nusb3xhc.inf"
- With the drivers added, unmount the WIM image and commit all changes to the paradigm:
dism /unmount-wim /mountdir:D:\Temp\mountain /commit
- Copy the kicking.wim prototype back to the USB installation media and reboot the laptop and install Windows.
Method x: Utilize the GigaByte Utility
In order to install Win7 on a Skylake-based (or newer) auto which has a CPU that MS all the same supports Win7 for, you must recreate new Win7 installation media (e.g. new bootable USB flash drive) which includes required USB iii.0 drivers because USB mouse/keyboard is supported by USB 3.0 in SKylake or newer chipsets. These necessary USB 3.0 drivers are not present in the original Win7 installation media. Same also is truthful for NVMe drivers (either for Intel or Samsung) if yous wanted to install Win7 to an NVMe target SSD, every bit these required NVMe drivers are also missing from the original Win7 install media.
The easiest and most reliable way to create usable bootable USB media to install Win7 with the required USB 3.0 commuter (and optionally also the required NVMe drivers) present is to use the Gigabyte USB Installation utility program, developed several years agone to support their own users who'd bought Gigabyte motherboards based on the Intel 100 Serial chipset.
The Gigabyte utility is available from the Gigabyte download site, scrolling down on the folio and expanding the "Utilities" category. Information technology is described every bit: Windows USB Installation Tool, (Note) Support Intel 100/200/X299 series motherboards. OS: Windows 7 64bit,Windows 7 32bit. The direct link to the utility on that folio is here.
But run the utility, specify the source Win7 installer (either CD/DVD or mounted ISO file), specify the output device (e.g. 8GB or larger USB flash drive), and check USB three.0 driver and optionally NVMe driver. You should uncheck the tertiary "packages" box, which volition for some reason automatically click on if you check the NVME second box. The utility will slipstream the missing requested drivers along with the original Win7 media into a new bootable USB flash bulldoze that you can then apply to install Win7 to a Skylake or newer car.
IMPORTANT Note: Afterwards y'all download the ZIP file, before unzipping it yous must turn off the BLOCKED security flag that is present. Unless you first remove the security flag before unzipping, the effect of unzipping volition be to prevent the expanded files from being attainable when you really run the Gigabyte utility (which also is ane of the files embedded in the ZIP file), and it will end abnormally with an error bulletin about "unable to add drivers…".
To solve the problem right-click on the Zilch file, select Properties, and you will encounter the Security item at the bottom of the General tab. Push button the UNBLOCK button, then APPLY/OK, and now yous are free to unzip this Naught file. All of the expanded files will now exist perfectly readable by the Gigabyte utility, and the process of adding USB 3.0 (and optionally NVMe) drivers to the original Win7 CD/DVD or ISO installer media to create new output bootable USB flash drive will run to normal completion.
Method xi: Disable Driver Signature Enforcement
Driver signing enforcement ensures that just drivers that have been sent to Microsoft for signing will load into the Windows kernel. This prevents malware from burrowing its way into the Windows kernel. Some users disabled commuter signing and they were able to become effectually this trouble after performing this step. After performing this step you'll be able to install drivers that aren't officially signed. Exist certain you know what you're doing and you should only install drivers you trust. Follow the steps indexed below to disable driver signature:
- Restart the figurer and wait for information technology to shut downwardly completely
- Ability the figurer back on and at startup, press, and tap the F8 key almost every 2d until yous meet the Advanced Boot Options.
- When the menu pops up, use the Downward arrow fundamental to gyre to "Disable driver signature enforcement" and printing "Enter". Continue the boot process.
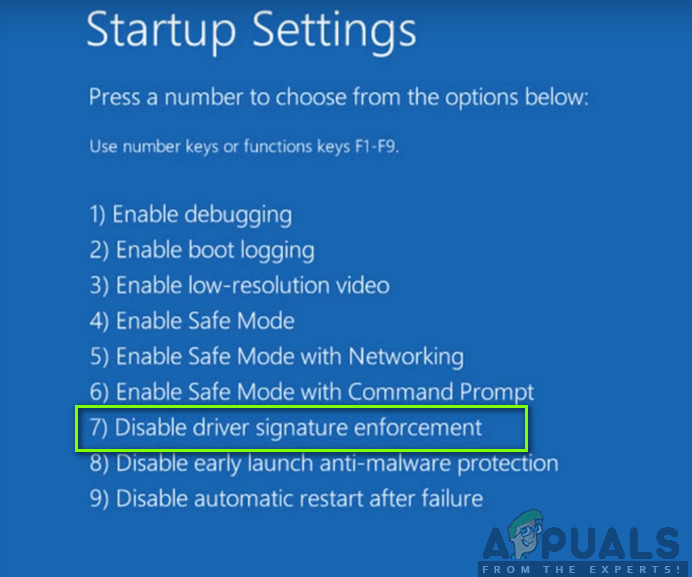
Disable driver signature enforcement.
Notation: This is a temporary solution. You lot have to repeat the process every time you want to utilise unsigned drivers.
Disable Driver Signature Enforcement Permanently:
Yous can effort commands to disable driver signature enforcement permanently and completely.
- Press "Windows' + "R" to open up the Run prompt.
- Inside the run prompt, type in "cmd" and press "Shift" + "Ctrl" + "Enter" to launch with admin permissions.
- Type the following commands one by one and press the Enter key:
bcdedit /set testsigning on bcdedit.exe -set loadoptions DDISABLE_INTEGRITY_CHECKS bcdedit.exe -ready TESTSIGNING ON
Note: You should receive the "The functioning completed successfully" message.
- Closeout of the command prompt at present and you should be able to install any drivers without requiring a digital signature.
Method 12: Recreate Your VM
Some people suggested that the iso file worked completely fine and this issue arose on their systems when they updated their Parallels. Some reported that the effect was still there until they realized they were trying to install with the VM of the previous version. When they deleted the older i and created a new one it worked. So if you are reading this, merely update your Parallels, delete your VMs and start over, don't worry most configuration, just make sure you lot start fresh.
- First of all delete your actual VM from your system.
- Afterward, update your Parallels Desktop. For example, it could be viii.0.18608 or something like that.
- Create the VM using a brand new downloaded ISO file. You tin can utilise a download managing director like ex. Folx etc.
- Lastly, recreate your VM and hopefully, the issue would exist rectified.
Method xiii: Download SATA Drivers (For HP Users Merely)
If you installing from the OEM disc that came with the computer and then it might exist causing the issue. HP is notorious for proprietary SATA drivers. If yous cannot find the original OEM disc, then proceed to HP's spider web site and download the SATA drivers and put them on a USB bulldoze. Click the browse option and information technology will let you select the driver from a USB drive. That should exist all you need to practise.
Method xiv: Contact Customer Support
Some estimator geeks reported that this error commonly occurs when the Windows seven DVD or the ISO epitome used to create said DVD, is corrupted. The best workaround for this issue is to re-download the Windows 7 ISO image to utilise with Parallels. Also re-fire the new ISO image to DVD if y'all still need a physical disc (for Boot Camp).
If this error occurs with a retail DVD you lot can ask for a replacement or cheque that your optical drive is in full working guild (having tried using a CD/DVD lens cleaner on it first).
Method 15: Check Hardware Faults
Another efficient remedy to this problem is to remove the DVD media and check for scratches, cracks or smudges that may make the DVD hard to read if the media is scratched or croaky, you must get replacement media. If the DVD is dirty or smudged, make clean the DVD with warm water and a soft material. Exist sore the DVD is completely clean and dry earlier re-inserting into the CD/DVD drive. Side by side, restart the computer and press any central when you lot are prompted and offset Setup.
Workaround: If yous withal tin't get rid of this issue so the last thing left for you is to burn down ISO epitome to DVD because this error appears just with a USB stick. In case you want to utilise a USB stick and so examine the USB stick's lite. You'll discover that whenever the error occurs that light blinks harmonic. Therefore, endeavor to pull and push the USB stick slowly and smoothly in its hub a couple of times. Subsequently doing this yous volition see that the light will showtime blinking continuously and this error volition go away soon. Keep one thing in mind that don't apply also much forcefulness on the stick, just pull and push button information technology very advisedly
Source: https://appuals.com/fix-a-required-cd-dvd-drive-device-driver-is-missing-error-message-when-installing-windows-7-from-a-usb/
Posted by: barronciame1947.blogspot.com
0 Response to "How To Install Cd Drive In Windows 7"
Post a Comment